Twitch sign-in with Embedded Wallets
Twitch authentication lets users authenticate with a Twitch account. Choose the default connection for the quickest setup, or configure a custom connection when you need your own Twitch application, consent screen, or identity provider.
Default Twitch sign-in
The default connection uses the Twitch OAuth credentials managed by Embedded Wallets. You don't need a Twitch developer application.
Caveats
- The Twitch consent screen identifies the OAuth application managed by Embedded Wallets, not your dapp.
- You can't change the Twitch application configuration, such as its scopes or branding, because you don't own the credentials.
- The default connection and a custom connection are separate connections, so they produce different wallet addresses for the same person unless you link them with a group connection.
Configure the default connection
- Open your project in the MetaMask Developer Dashboard.
- Select Social Connections.
- Enable Twitch.
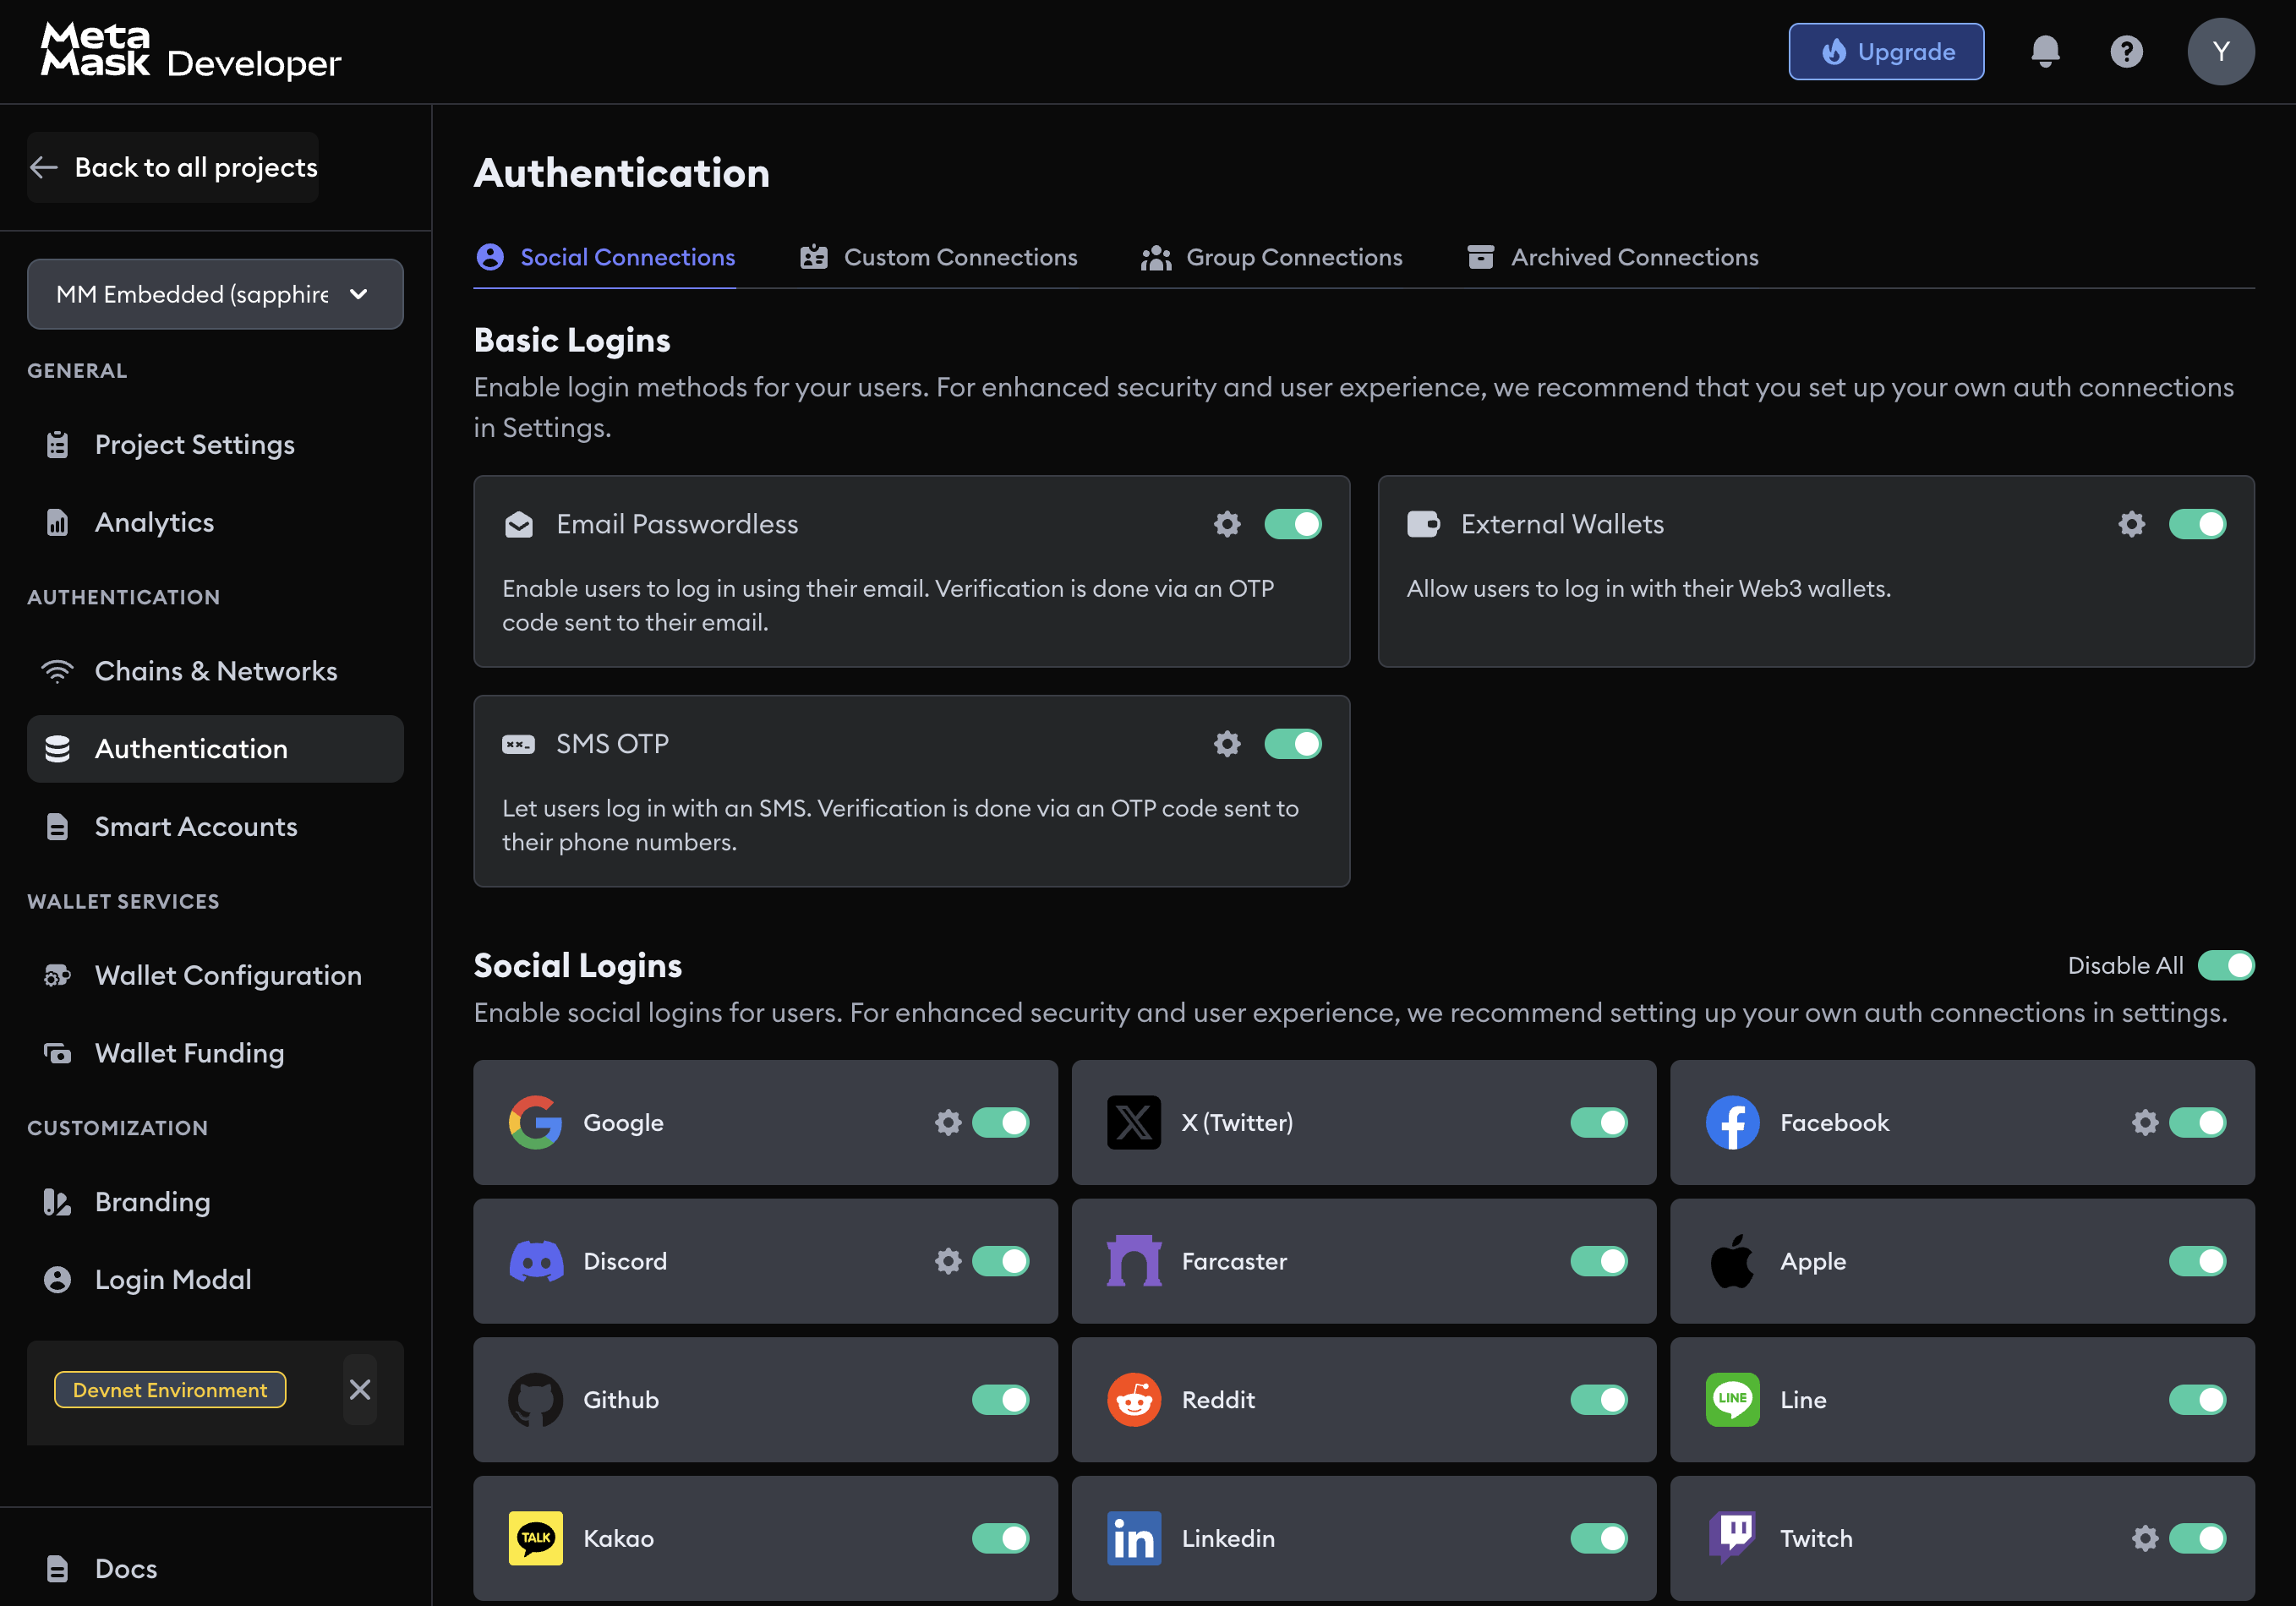
The SDK reads the connection from the dashboard. You don't need to add Twitch credentials to your SDK configuration.
Custom Twitch sign-in
Use a custom connection when the Twitch authorization belongs to your dapp or an identity platform you control. You can register a Twitch client ID on the social connection, or run Twitch through Auth0 or your own backend.
Firebase Authentication and Amazon Cognito don't offer Twitch as a first-party social provider. Use Auth0, a native Twitch client ID, or your own JWT.
Decide between the default and a custom connection before you onboard users. Moving from the default Twitch connection to a custom Twitch, Auth0, or JWT connection changes every user's wallet address unless both connections are in a group connection with matching user identifiers.
Your Twitch application
-
Add
https://auth.web3auth.io/authas an OAuth Redirect URL.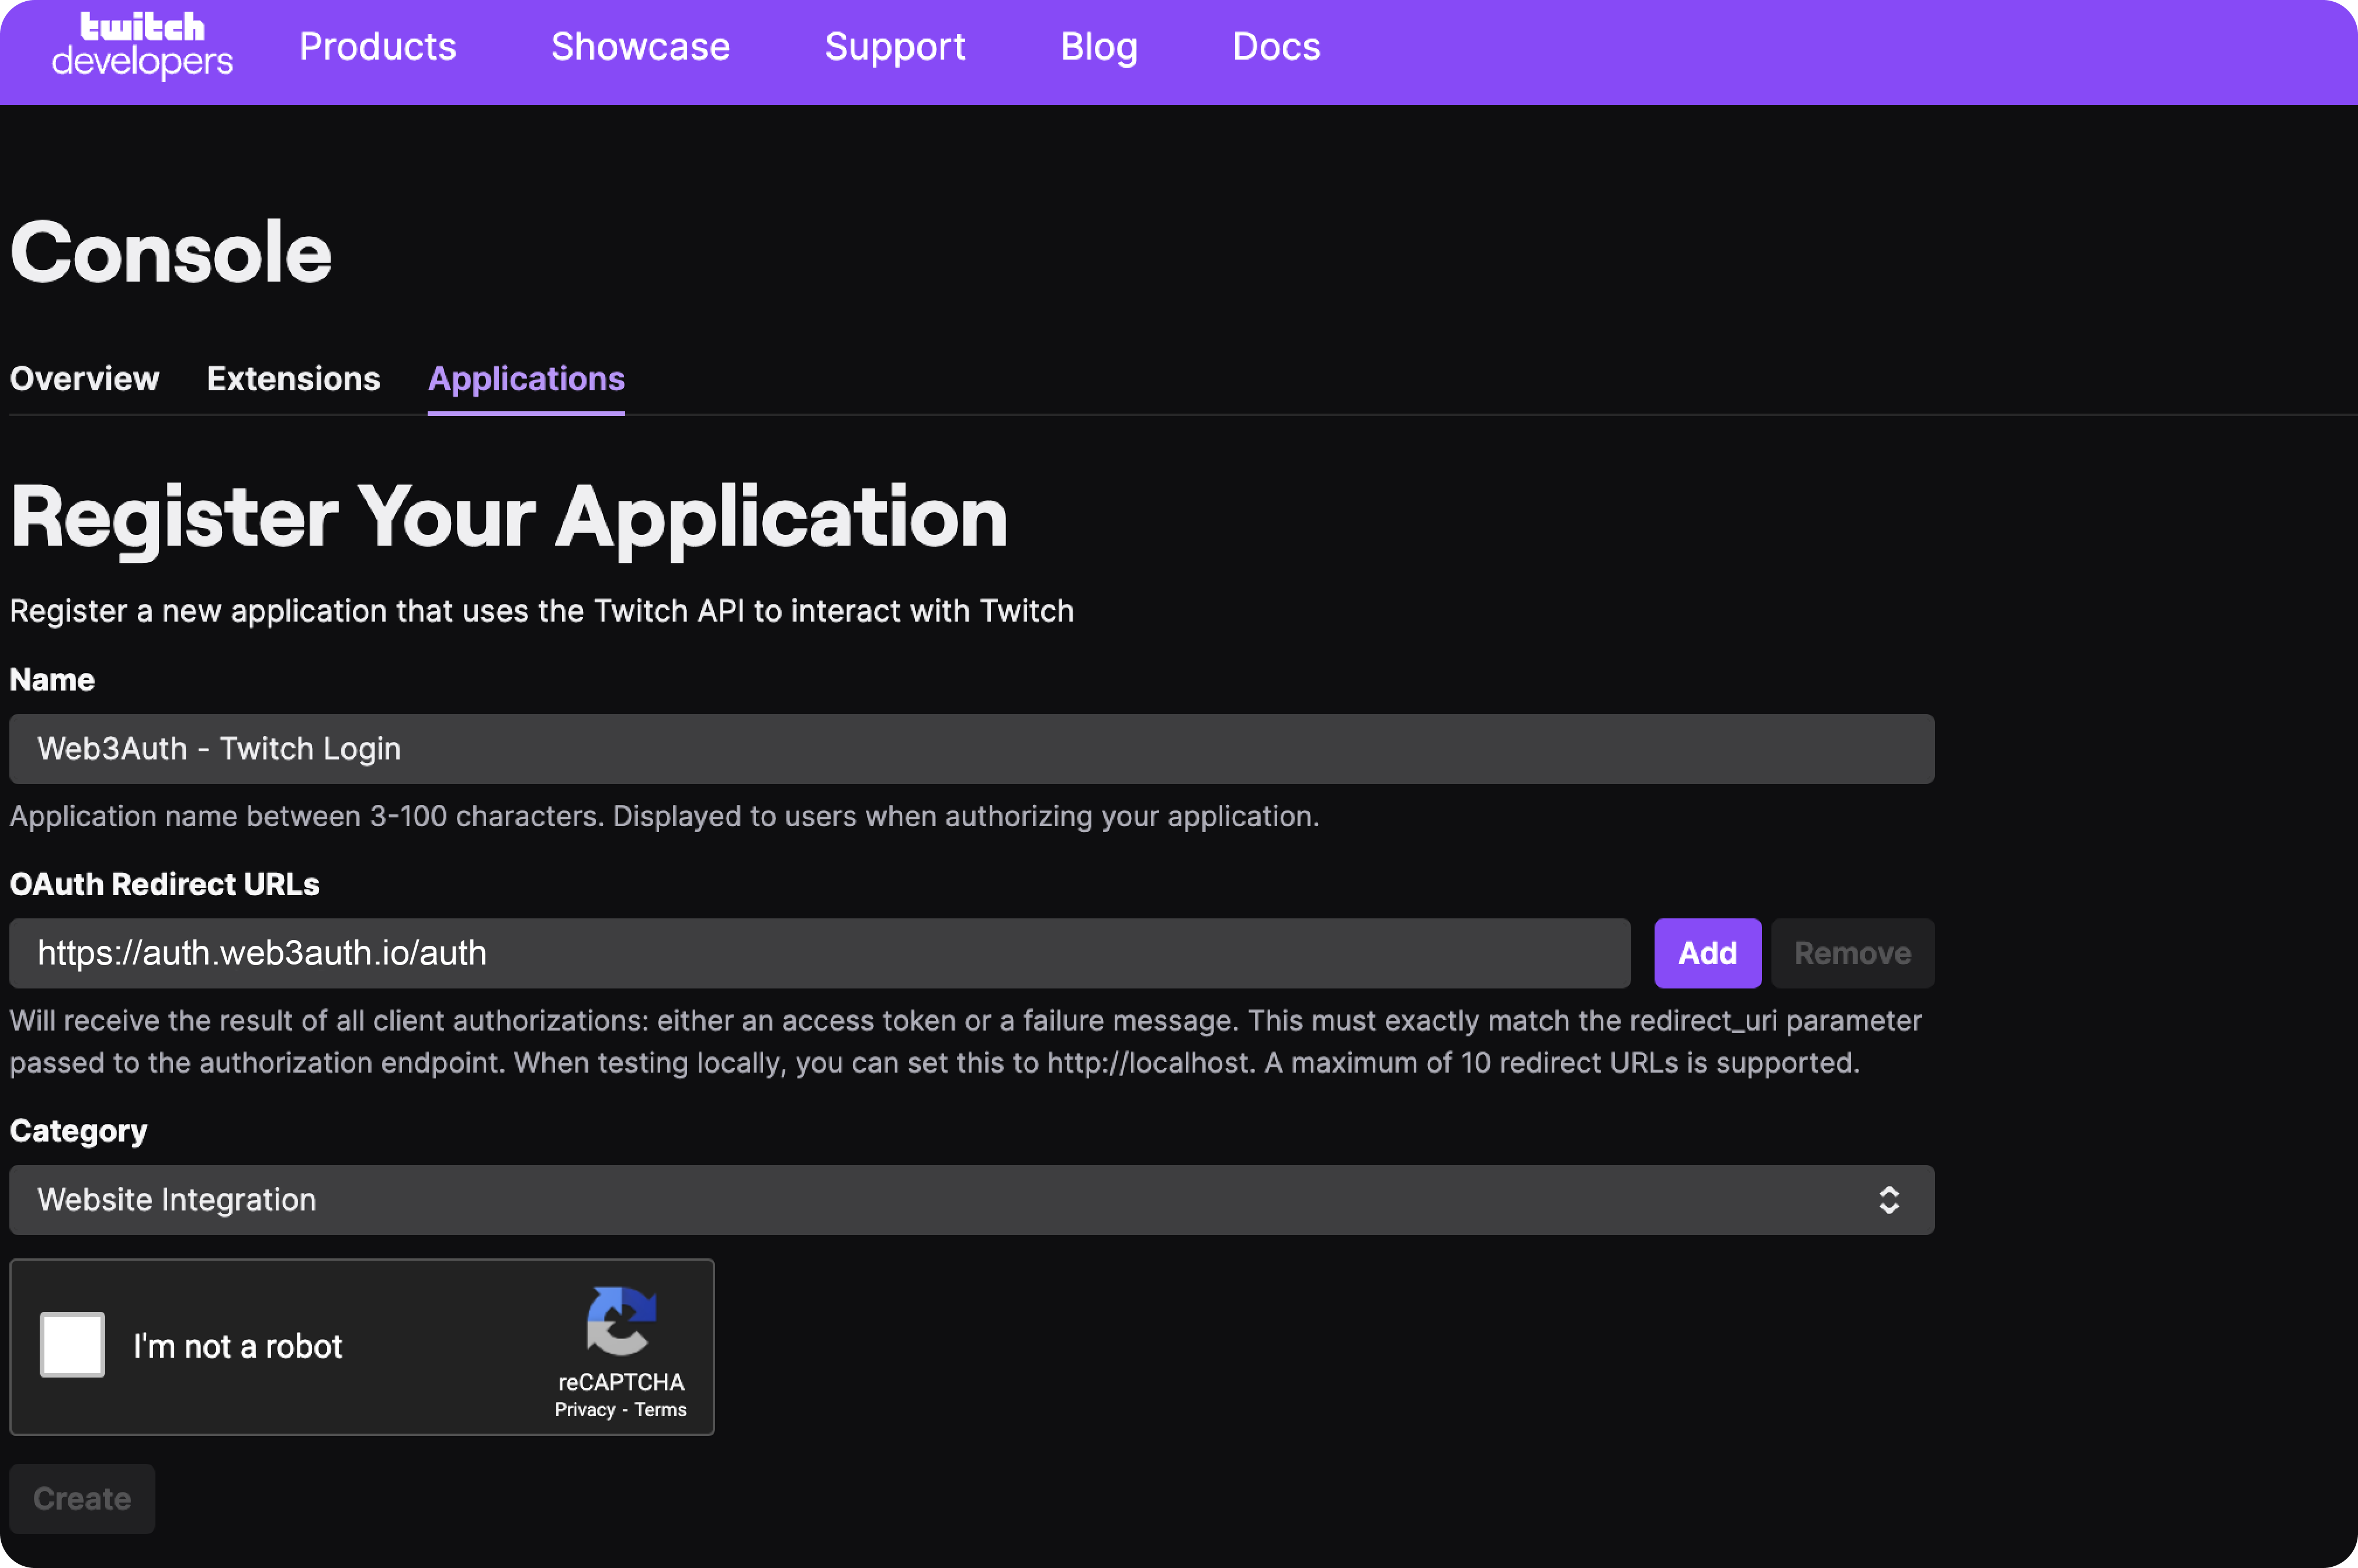
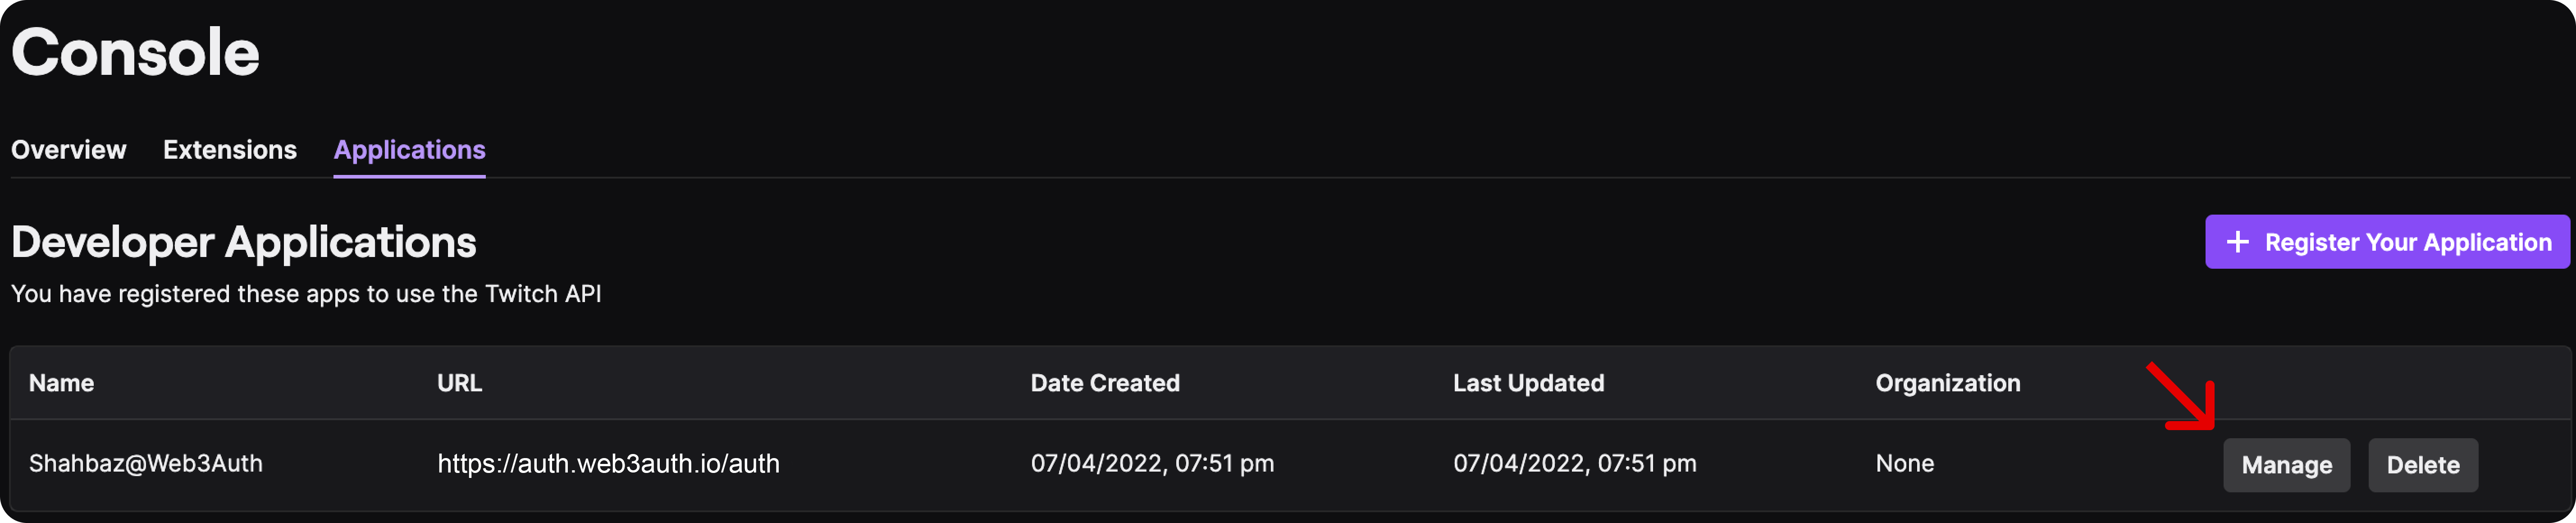
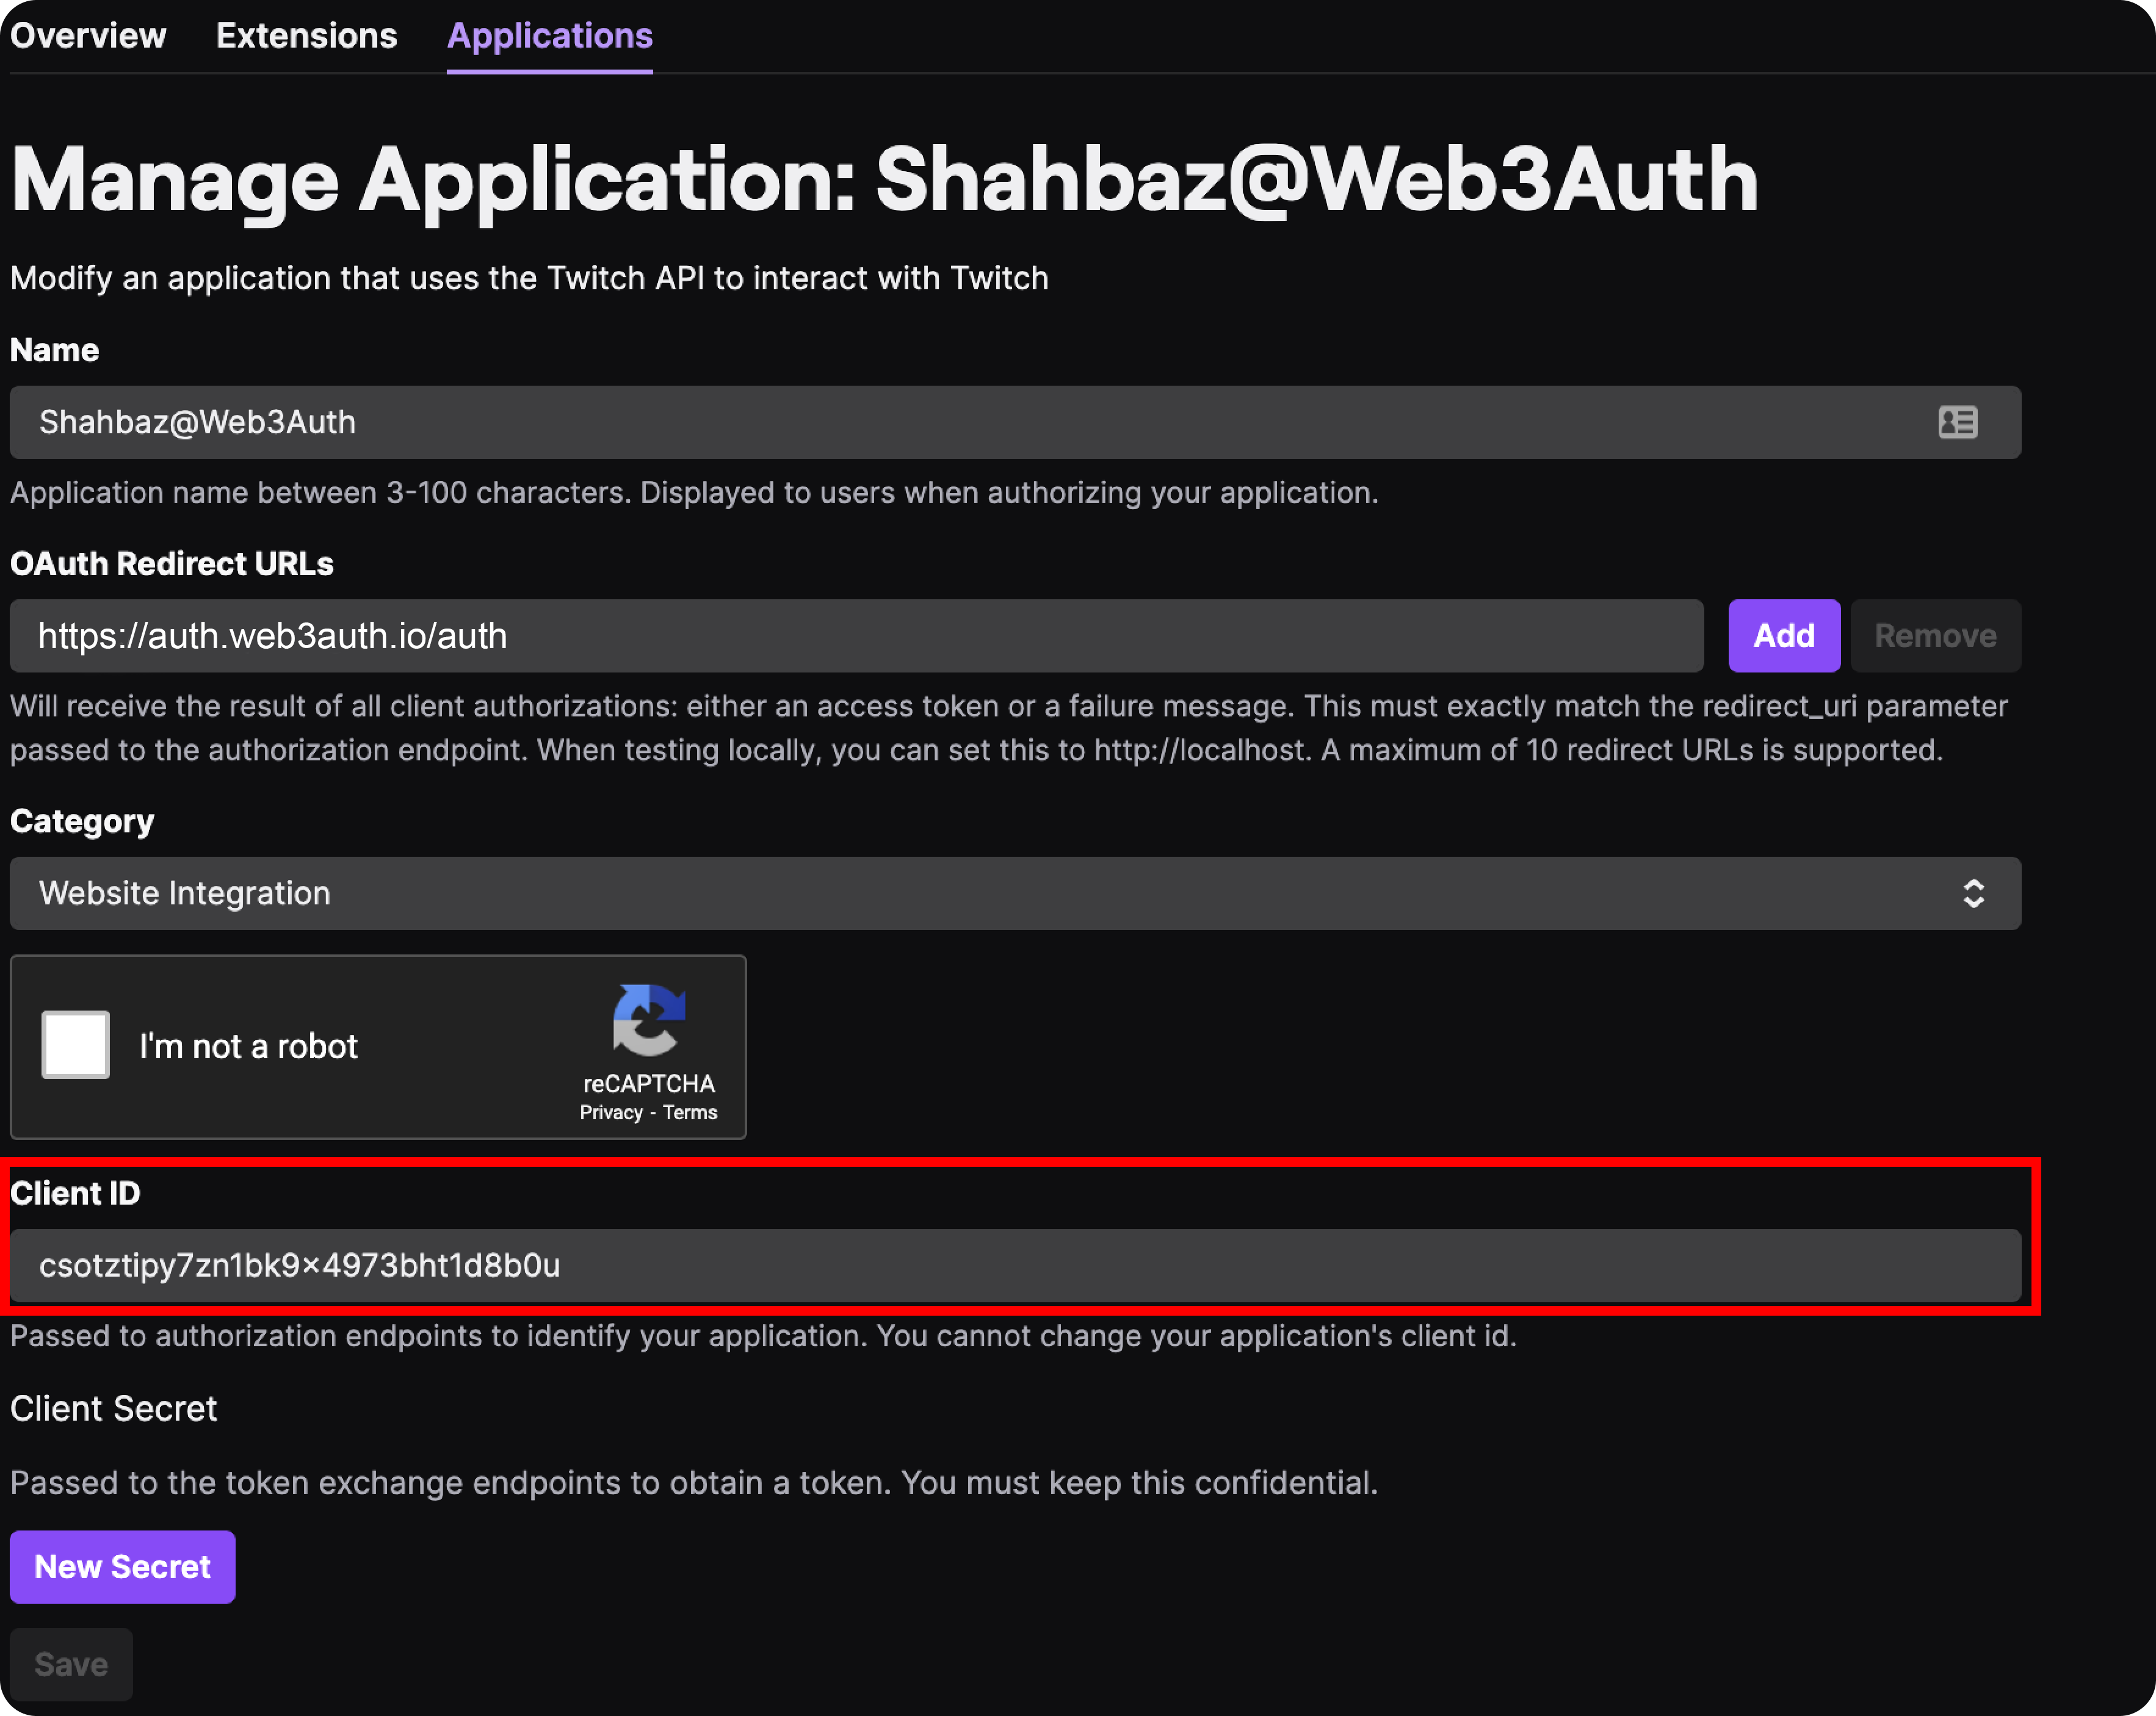
-
Open Manage on the application and copy the Client ID.
-
In the MetaMask Developer Dashboard, open Social Connections, select the settings icon next to Twitch, and enter an Auth Connection ID and the Twitch Client ID.
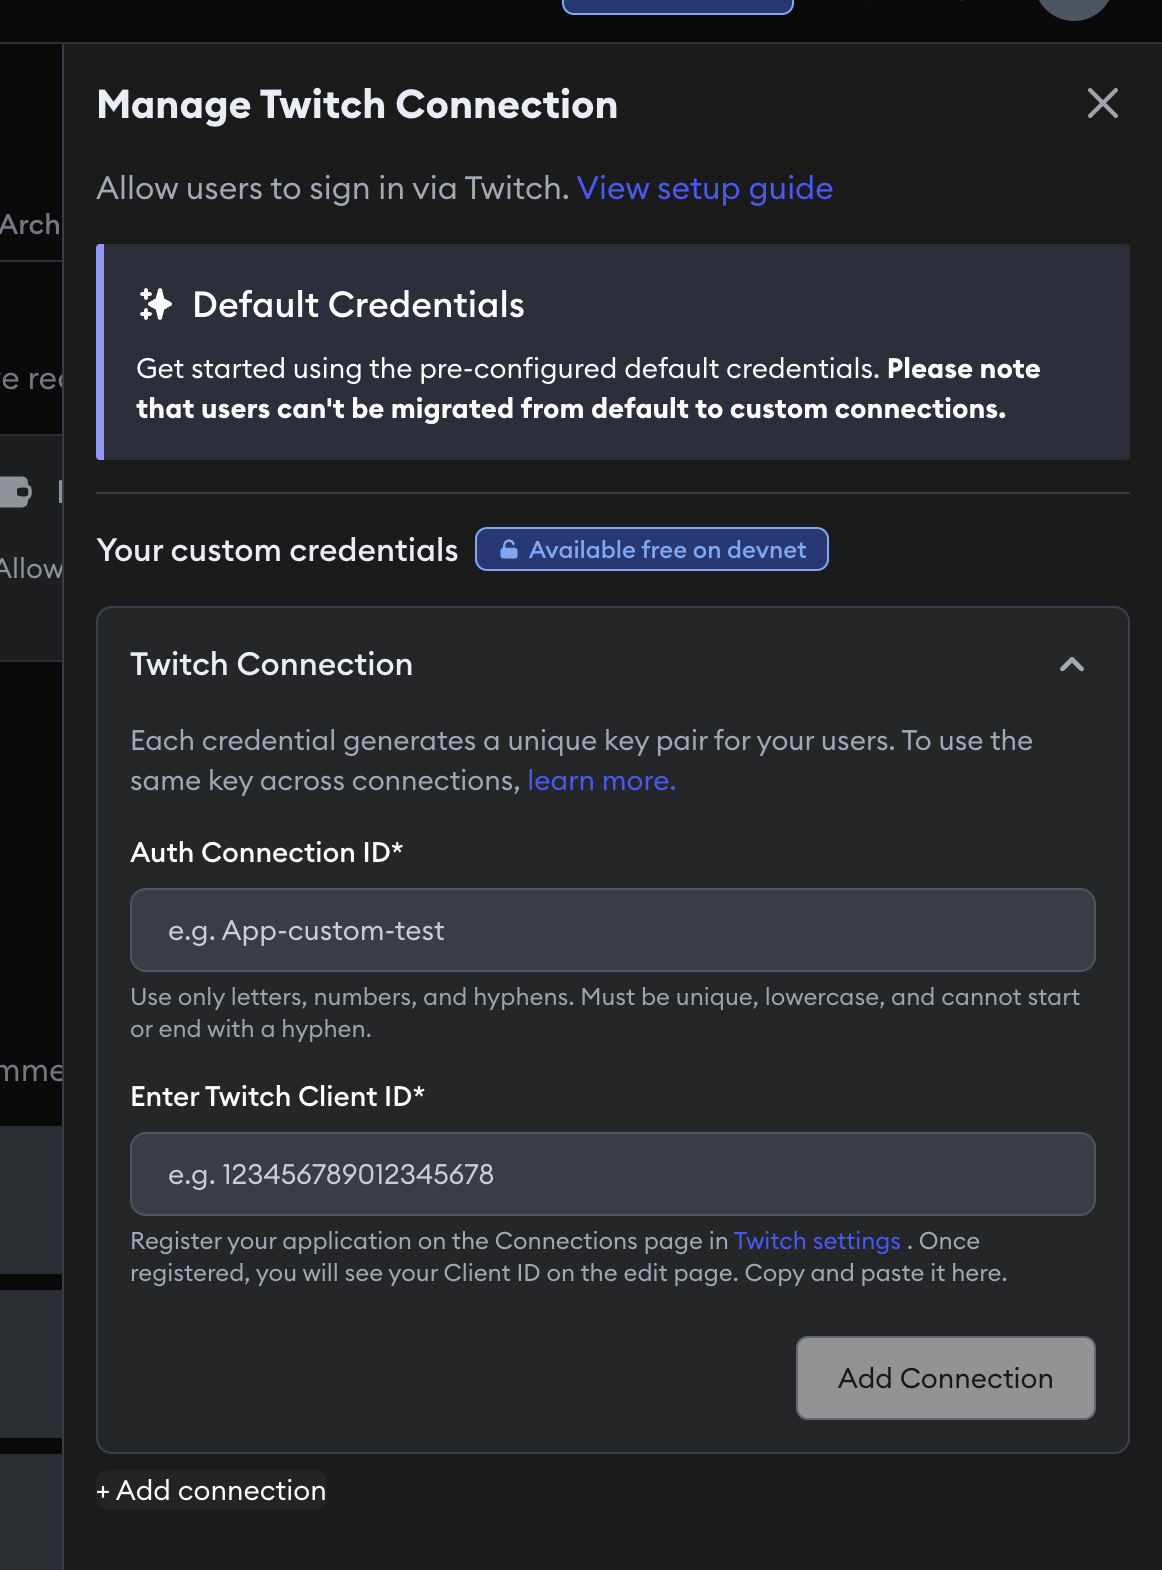
Call Embedded Wallets with AUTH_CONNECTION.TWITCH and that Auth Connection ID.
Auth0
- Configure Twitch as a social connection in Auth0.
- Create an Auth0 connection in the MetaMask Developer Dashboard.
- For an implicit flow, call Embedded Wallets with the Auth0 connection ID and set the Auth0
connection name to
twitch. - For a JWT flow, authenticate with the Auth0 SDK, retrieve its raw ID token, and pass that token to Embedded Wallets.
Your own backend
- Complete Twitch OAuth in your client and send the result to your backend.
- Exchange the authorization code with Twitch's token endpoint and validate the user identity before trusting it.
- Issue a fresh JWT with an
iatno more than 60 seconds old and expose the signing public key through a JSON Web Key Set (JWKS) endpoint. - Create a custom JWT connection that validates your issuer, audience, JWKS, and user identifier.
- Pass your JWT and custom connection ID to Embedded Wallets.
Don't send a Twitch client secret to a client application.
Group Twitch connections
A group connection gives the same person one wallet address across several login methods.
Default Twitch, a native Twitch client ID, and Twitch through Auth0 are separate connections.
They produce different wallet addresses unless you group them and every connection in the group
uses the same JWT user identifier (email or an aligned sub).
Pass both the child connection ID and grouped connection ID when you bypass the modal:
await connectTo(WALLET_CONNECTORS.AUTH, {
  authConnection: AUTH_CONNECTION.CUSTOM,
  authConnectionId: '<TWITCH_AUTH_CONNECTION_ID>',
  groupedAuthConnectionId: '<GROUPED_AUTH_CONNECTION_ID>',
  idToken,
})
Usage examples
The implicit examples open a Twitch or Auth0 authorization flow. The JWT examples assume your Auth0 or backend integration has already returned a fresh ID token.
Default implicit flow
- React
- Vue
- JavaScript
- React Native
- Android
- iOS
- Flutter
- Unity
- Unreal Engine
import { AUTH_CONNECTION, WALLET_CONNECTORS } from '@web3auth/modal'
import { useWeb3AuthConnect } from '@web3auth/modal/react'

const { connectTo } = useWeb3AuthConnect()

await connectTo(WALLET_CONNECTORS.AUTH, {
  authConnection: AUTH_CONNECTION.TWITCH,
})
import { AUTH_CONNECTION, WALLET_CONNECTORS } from '@web3auth/modal'
import { useWeb3AuthConnect } from '@web3auth/modal/vue'

const { connectTo } = useWeb3AuthConnect()

await connectTo(WALLET_CONNECTORS.AUTH, {
  authConnection: AUTH_CONNECTION.TWITCH,
})
import { AUTH_CONNECTION, WALLET_CONNECTORS } from '@web3auth/modal'

await web3auth.connectTo(WALLET_CONNECTORS.AUTH, {
  authConnection: AUTH_CONNECTION.TWITCH,
})
import { AUTH_CONNECTION, useWeb3AuthConnect } from '@web3auth/react-native-sdk'

const { connectTo } = useWeb3AuthConnect()

await connectTo({
  authConnection: AUTH_CONNECTION.TWITCH,
})
val response = web3Auth.connectTo(
  LoginParams(AuthConnection.TWITCH)
)
let response = try await web3Auth.connectTo(
    loginParams: LoginParams(authConnection: .TWITCH)
)
final response = await Web3AuthFlutter.login(
  LoginParams(loginProvider: Provider.twitch),
);
var options = new LoginParams
{
    loginProvider = Provider.TWITCH
};

web3Auth.login(options);
FWeb3AuthLoginParams LoginParams;
LoginParams.LoginProvider = TEXT("twitch");

UWeb3AuthSDK::GetInstance()->Login(LoginParams);
Native custom implicit flow
Use these examples after you add your own client ID on the social connection in the dashboard. For Android and iOS, add the connection to authConnectionConfig during initialization. Flutter, Unity, and Unreal Engine currently use their platform's loginConfig; configure it by following the custom authentication guide for Flutter, Unity, or Unreal Engine.
- React
- Vue
- JavaScript
- React Native
- Android
- iOS
- Flutter
- Unity
- Unreal Engine
await connectTo(WALLET_CONNECTORS.AUTH, {
  authConnection: AUTH_CONNECTION.TWITCH,
  authConnectionId: '<AUTH_CONNECTION_ID>',
})
await connectTo(WALLET_CONNECTORS.AUTH, {
  authConnection: AUTH_CONNECTION.TWITCH,
  authConnectionId: '<AUTH_CONNECTION_ID>',
})
await web3auth.connectTo(WALLET_CONNECTORS.AUTH, {
  authConnection: AUTH_CONNECTION.TWITCH,
  authConnectionId: '<AUTH_CONNECTION_ID>',
})
await connectTo({
  authConnection: AUTH_CONNECTION.TWITCH,
  authConnectionId: '<AUTH_CONNECTION_ID>',
})
val response = web3Auth.connectTo(
  LoginParams(
    authConnection = AuthConnection.TWITCH,
    authConnectionId = "<AUTH_CONNECTION_ID>"
  )
)
let response = try await web3Auth.connectTo(
    loginParams: LoginParams(
        authConnection: .TWITCH,
        authConnectionId: "<AUTH_CONNECTION_ID>"
    )
)
final response = await Web3AuthFlutter.login(
  LoginParams(loginProvider: Provider.twitch),
);
var options = new LoginParams
{
    loginProvider = Provider.TWITCH
};

web3Auth.login(options);
Configure the custom social connection in Blueprint by following the Unreal Engine custom authentication guide.
Auth0 implicit flow
These examples use the Auth0 custom connection configured for your SDK. Replace the connection ID and domain with your Auth0 values. For Android and iOS, add the connection to authConnectionConfig during initialization. Flutter, Unity, and Unreal Engine currently use their platform's loginConfig; configure it by following the custom authentication guide for Flutter, Unity, or Unreal Engine.
- React
- Vue
- JavaScript
- React Native
- Android
- iOS
- Flutter
- Unity
- Unreal Engine
await connectTo(WALLET_CONNECTORS.AUTH, {
  authConnection: AUTH_CONNECTION.CUSTOM,
  authConnectionId: '<AUTH0_CONNECTION_ID>',
  extraLoginOptions: {
    connection: 'twitch',
  },
})
await connectTo(WALLET_CONNECTORS.AUTH, {
  authConnection: AUTH_CONNECTION.CUSTOM,
  authConnectionId: '<AUTH0_CONNECTION_ID>',
  extraLoginOptions: {
    connection: 'twitch',
  },
})
await web3auth.connectTo(WALLET_CONNECTORS.AUTH, {
  authConnection: AUTH_CONNECTION.CUSTOM,
  authConnectionId: '<AUTH0_CONNECTION_ID>',
  extraLoginOptions: {
    connection: 'twitch',
  },
})
await connectTo({
  authConnection: AUTH_CONNECTION.CUSTOM,
  authConnectionId: '<AUTH0_CONNECTION_ID>',
  extraLoginOptions: {
    connection: 'twitch',
  },
})
val response = web3Auth.connectTo(
  LoginParams(
    authConnection = AuthConnection.CUSTOM,
    authConnectionId = "<AUTH0_CONNECTION_ID>",
    extraLoginOptions = ExtraLoginOptions(
      domain = "https://<AUTH0_DOMAIN>",
      connection = "twitch"
    )
  )
)
let response = try await web3Auth.connectTo(
    loginParams: LoginParams(
        authConnection: .CUSTOM,
        authConnectionId: "<AUTH0_CONNECTION_ID>",
        extraLoginOptions: ExtraLoginOptions(
            domain: "https://<AUTH0_DOMAIN>",
            connection: "twitch"
        )
    )
)
final response = await Web3AuthFlutter.login(
  LoginParams(
    loginProvider: Provider.jwt,
    extraLoginOptions: ExtraLoginOptions(
      domain: 'https://<AUTH0_DOMAIN>',
      verifierIdField: 'sub',
      connection: 'twitch',
    ),
  ),
);
var options = new LoginParams
{
    loginProvider = Provider.JWT,
    extraLoginOptions = new ExtraLoginOptions
    {
        domain = "https://<AUTH0_DOMAIN>",
        verifierIdField = "sub",
        connection = "twitch"
    }
};

web3Auth.login(options);
The current Unreal Engine SDK documentation provides this flow through Blueprint configuration, not a verified C++ example. Configure the Auth0 connection by following the Unreal Engine custom authentication guide.
JWT flow
Obtain a fresh ID token from your identity aggregator or backend before calling Embedded Wallets. The token issuer and claims must match the custom connection in the dashboard.
- React
- Vue
- JavaScript
- React Native
- Android
- iOS
- Flutter
- Unity
- Unreal Engine
- Node.js
const idToken = await getIdToken()

await connectTo(WALLET_CONNECTORS.AUTH, {
  authConnection: AUTH_CONNECTION.CUSTOM,
  authConnectionId: '<CUSTOM_CONNECTION_ID>',
  idToken,
})
const idToken = await getIdToken()

await connectTo(WALLET_CONNECTORS.AUTH, {
  authConnection: AUTH_CONNECTION.CUSTOM,
  authConnectionId: '<CUSTOM_CONNECTION_ID>',
  idToken,
})
const idToken = await getIdToken()

await web3auth.connectTo(WALLET_CONNECTORS.AUTH, {
  authConnection: AUTH_CONNECTION.CUSTOM,
  authConnectionId: '<CUSTOM_CONNECTION_ID>',
  idToken,
})
const idToken = await getIdToken()

await connectTo({
  authConnection: AUTH_CONNECTION.CUSTOM,
  authConnectionId: '<CUSTOM_CONNECTION_ID>',
  idToken,
})
val response = web3Auth.connectTo(
  LoginParams(
    authConnection = AuthConnection.CUSTOM,
    authConnectionId = "<CUSTOM_CONNECTION_ID>",
    idToken = idToken
  )
)
let response = try await web3Auth.connectTo(
    loginParams: LoginParams(
        authConnection: .CUSTOM,
        authConnectionId: "<CUSTOM_CONNECTION_ID>",
        idToken: idToken
    )
)
final response = await Web3AuthFlutter.login(
  LoginParams(
    loginProvider: Provider.jwt,
    extraLoginOptions: ExtraLoginOptions(
      id_token: idToken,
    ),
  ),
);
var options = new LoginParams
{
    loginProvider = Provider.JWT,
    extraLoginOptions = new ExtraLoginOptions
    {
        id_token = idToken
    }
};

web3Auth.login(options);
The current Unreal Engine SDK documentation doesn't provide a verified C++ JWT example. Configure the JWT connection and login in Blueprint by following the Unreal Engine custom authentication guide.
const result = await web3auth.connect({
  authConnectionId: '<CUSTOM_CONNECTION_ID>',
  idToken,
})